t.akustik DS5-5 Drum Shield

28

Sound Shield

  • Transparent 5-segment panel for live and studio use
  • Sound- and noise shielding for drum kits, amplifiers or instruments
  • Indispensable for controlling volume on stage and in the studio and for clean mixes
  • Easy to handle thanks to an accordion-style foldable design
  • Material: Very high-quality laser cut acrylic
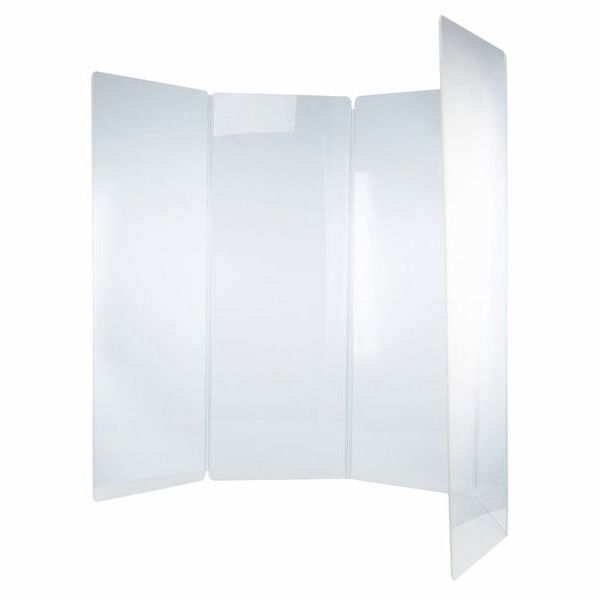
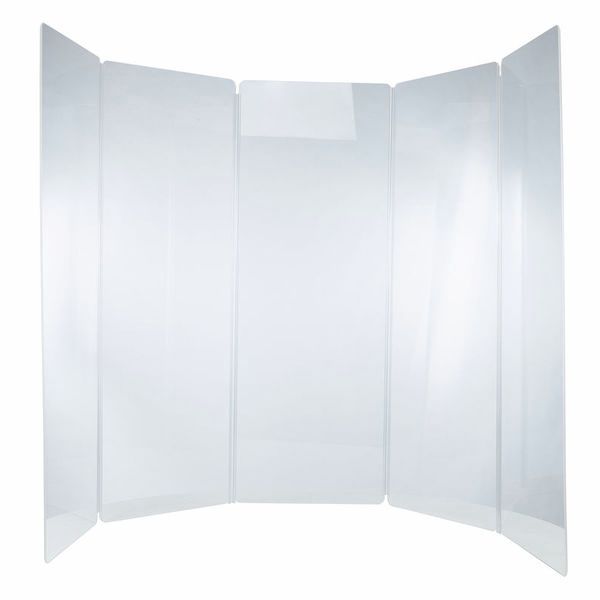
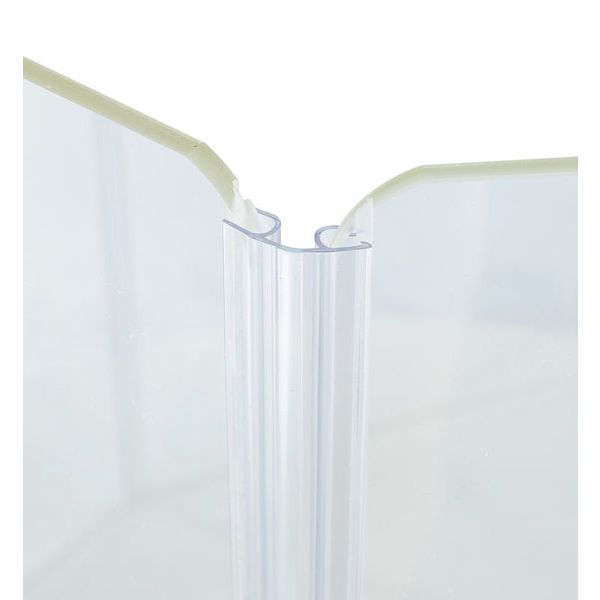
  • Consists of 5 panels with connectors (hinges)
  • Thickness per panel: 5.5 mm
  • Dimensions per panel (H x W): 1660 x 600 mm
  • Weight: Approx. 36.0 kg
Available since June 2019
Item number 456558
Sales Unit 1 piece(s)
Type Absorber wall
Number of Panels 5
Height in cm 166 cm
Dimensions 1600 x 3000 mm
Width in cm 300 cm
Show more
5.899 kr
Free shipping incl. VAT
In stock
In stock

This product is in stock and can be shipped immediately.

Standard Delivery Times
1

An acrylic shield that makes a big difference

When recording sound using the overdub method, crosstalk from neighbouring sound sources is usually not a problem. However, if all artists are recorded simultaneously, unwanted crosstalk between neighbouring sound sources can occur, especially in (excessively) small recording rooms. One of the instruments that always stands out in this context is the drums. The DS5-5 Drum Shield from t.akustik is an adequate solution to this dilemma and at the same time offers the advantage that the transparency of the acrylic allows eye contact between the artists.

Easy to handle and practical to transport

The DS5-5 Drum Shield consists of five individual panels that are joined together with the corresponding connectors (hinges). Once the panels are connected to each other, handling is very simple. To make the DS5-5 Drum Shield portable, the panels fold together in an accordion style, and conversely, they are folded out again during setup - it doesn't get much easier than that. Each panel is 166 cm high, 60 cm wide, and 5.5 mm thick. When assembled, the DS5-5 Drum Shield has a length of 300 cm. When folded and with a total weight of about 36 kg, it can just about be carried under your arm.

For sound engineers and instrumentalists

Technicians in the studio are by no means the only people who want to shield certain sound sources. There are also situations during live shows where shielding can come in handy, and it can also be put to adequate use in the rehearsal room. The DS5-5 Drum Shield from t.akustik is a transparent acrylic screen that offers reliable sound shielding in every situation and can thus ensure effective volume control. Thanks to its very reasonable purchase price, it offers both professional and semi-professional users attractive value for money.

About t.akustik

t.akustik has been part of the Thomann portfolio since 1997 and has established a solid reputation through its quality products at affordable prices. The brand specialises in all items that optimise the acoustics of recording studios, or any room in which music is to be recorded, by neutralising possible interferences as much as possible. So, if you need absorbers, sound diffusers, bass traps, and much more, t.akustik's extensive range is definitely worth checking out.

For the stage, studio, and rehearsal room

Even if the DS5-5 Drum Shield's name already indicates its preferred area of use, it is also suitable for shielding amplifiers and other instruments, a job that it does just as well. Apart from the professional areas of use on stage and in the studio, the DS5-5 Drum Shield can of course also be a great asset in private use. After all, the volume in small rehearsal rooms can be deafening, so even the smallest amount of damping is an improvement to the situation. In short: Your ears will thank you.

28 Customer ratings

4.2 / 5

You have to be logged in to rate products.

Note: To prevent ratings from being based on hearsay, smattering or surreptitious advertising we only allow ratings from real users on our website, who have bought the equipment from us.

After logging in you will also find all items you can rate under rate products in the customer centre.

quality

22 Reviews

SD
Not a job for one peron
Shaun D. 03.03.2021
Once the drum shield is assembled it is an excellent product for noise reduction. The one thing that is not mentioned in any advertising or promotion of the product is that it is extremely difficult to assemble. The included instructions are poor to say the least.Attaching the invisible hinges to the prespex sheets is a most testing task.......but we got there in the end by as the included instruction "soldier for the final product,so please keep patient"! Have to add patience was wearing thin at times! It would be most delightful if this came already assembled from the manufacturer.
quality
0
0
Report

Report

m
molnarilles 10.11.2020
It's hard to put the pieces together, but works and looks great!
quality
2
0
Report

Report

google translate de
Unfortunately there was an error. Please try again later.
(
Super Teil!
(FK) 28.12.2021
Der Schallschutz funktioniert besser als erwartet. Tolles Produkt!

Der Zusammenbau ist (wie hier schon mehrfach zu lesen war) nicht ganz so einfach, kann aber mit etwas handwerklichem Geschick auch von einer Person erledigt werden, wenn man sich nicht an die Montageanleitung hält.
Ich habe alleine ca. 60 min für den Zusammenbau benötigt. Das lag allerdings daran, dass ich zunächst entsprechend der farbigen Montageanleitung vorgegangen bin und nach dem Versuch zwei Elementen zu verbinden diese wieder auseinander schieben musste. Der Zusammenbau sollte in kürzerer Zeit klappen, wenn man wie folgt vorgeht (evtl. spielt es auch eine Rolle, dass ich die Elemente im beheizten Proberaum zusammengebaut habe):

1)
Bei Interesse die Montageanleitung lesen und dann ordnungsgemäß entsorgen.

2)
Ein Element mit der schmalen Seite senkrecht vor eine Wand stellen (lange Seite der Scheibe unten und 90°-Winkel zwischen Scheibe und Wand). Damit weder Wand noch Scheibe beschädigt werden, eventuell etwas zwischen Element und Wand, sowie Element und Boden legen. Es muss etwas zum Anlehnen der Scheibe neben diese gestellt werden. Wenn eine Schiene auf eine Scheibe geschoben wird, sollte die Scheibe immer vor einer Wand stehen, damit diese nicht wegrutschen kann.

3)
Die Verbindungsschienen haben eine gebogene Seite mit einem Wulst, der in die Aussparung der Scheibe geschoben wird und eine gerade Seite, an der dieser Wulst ist. Die Seiten der Schiene verhalten sich bei der Montage unterschiedlich! Zunächst die gebogene Seite (mit Wulst) so weit in die Scheibe schieben (Wulst in Richtung der Aussparung), bis es nicht mehr möglich ist, dieses mit den Händen zu bewerkstelligen (ungefähr das letzte Fünftel der Scheibe blieb bei mir übrig). Nun ein kleines Brett vor das Ende der Schiene halten und mit einem Gummihammer vorsichtig die Schiene bis zur gewünschten Position hineinschlagen. Die Schiene sitzt nun fest an der Scheibe.

4)
Die nächste Scheibe kann jetzt ganz einfach in die gewünschten Position geschoben werden (der Wulst an der geraden Seite der Schiene muss in die Aussparung, sonst lassen sich die Elemente später nicht zusammenklappen). Ich habe dazu kein Gleitmittel benötigt. Beide Scheiben stehen beim Zusammenschieben senkrecht übereinander (hier könnte eine zweite Person hilfreich sein). Einmal ist die Schiene etwas gerutscht - einfach mit der schmalen Seite des Bretts und dem Gummihammer zurückschlagen, wenn die Scheibe in der Endposition ist.

5)
Jetzt kann man die untere, senkrecht stehende Scheibe flach auf den Boden legen (darauf achten, dass die Scheibe möglichst plan liegt und nicht durch den Untergrund beschädigt wird) und die gerade neu angebrachte Scheibe im 90°-Winkel dazu senkrecht hinstellen. Es muss darauf geachtet werden, dass die Scheibe zur richtigen Seite bewegt wird, da sonst die Schiene wieder von der Scheibe abspringt.

6)
Wieder bei 3) anfangen, bis alle Scheiben verbunden sind.

7)
Nun den Stapel mit den Elementen senkrecht hinstellen und so aufklappen, dass diese nicht umfallen können. Jetzt kann die Folie ganz einfach entfernt werden.

8)
Die restliche Verpackung ordnungsgemäß entsorgen.
quality
8
0
Report

Report

google translate it
Unfortunately there was an error. Please try again later.
M
Giunti impossibili da inserire
Marcoli 11.03.2020
I pannelli in se non sono male, il problema sono le giunzioni, ci vogliono ore e ore per metterli se ti va bene e non li rompi, per non dire che sono poco flessibili. In pratica ci vuole una giornata per montarli e una giornata per smontarli, in poche parole non è un prodotto pratico. Se vi serve una struttura fissa da far rimanere ferma in un luogo potrebbe anche andare bene, ma se dovete montare e smontare non ne vale la pena.
quality
1
0
Report

Report